Le partenaire pour la captation, transmission et mise à disposition de vos données
IoT deployment is one of the most critical stages in any connected project. A poorly installed or misconfigured sensor, or one placed in an area with weak radio coverage, can compromise data quality and lead to costly field interventions.
Successfully installing IoT sensors in Smart Building projects — or any other use case — requires a precise methodology: radio mapping, site preparation, device configuration, network validation and monitoring.
Discover the best practices to ensure a reliable, scalable and long-lasting IoT deployment.
Why deployment is a critical stage in an IoT project
The success of an IoT project does not depend solely on the choice of sensors or the monitoring platform. Field deployment quality plays a major role in:
- data reliability
- sensor autonomy
- radio communication stability
- maintenance costs
- the ability to scale across multiple sites
A poorly prepared deployment can quickly lead to:
- data loss
- costly maintenance interventions
- radio coverage issues
- reduced sensor battery life
Conversely, a well-structured IoT deployment ensures sustainable operations and a faster return on investment.
The key stages of a successful IoT deployment
- Radio mapping
- Network selection
- Deployment planning
Sensors preparation
- Sensor configuration
- Adeunis configuration solutions
On-site installation
- Network testing
- Radio best practices
- On-site deployment execution
- Common deployment mistakes
- How to industrialise multi-site IoT deployments

Site preparation
1- Radio-mapping
The first step prior to installation is to fully understand the environment. IoT sensors will be deployed in locations where it is essential to ensure sufficient network coverage for reliable communication. This is the radio mapping phase.
Using a network qualification tool such as the Field Test Device (FTD), operators can measure and validate network coverage across target areas.
This study can help to:
- choose one network over another
- identify the need for a private network
- optimise sensor placement
- anticipate building-related radio constraints
Whatever the final choice, radio mapping remains essential. It provides the best technical and economic foundation for a successful IoT project.
2- Choosing the right network for an IoT deployment
The choice of network (LoRaWAN, NB-IoT, LTE-M, etc.) depends on multiple criteria, such as:
- number of sensors
- building type and topology
- data criticality
- level of infrastructure control required
- geographical scope of the project
Private LoRaWAN network
- Full control over network coverage (gateway placement based on required coverage points)
- Control over network costs (gateways and number of nodes)
- Local data management (no need to rely on external servers)
- Requires expert implementation
- Higher upfront investment costs (labour + equipment)
- Ongoing infrastructure maintenance costs (labour + spare parts)
Operated LoRaWAN network
- Ready to use
- Network infrastructure managed by the operator
- IoT backend provided by telecom operators
- Ideal for nationwide or geographically dispersed deployments
- International deployment possible
- Dependent on operator network coverage (white zones or edge-of-coverage areas)
- Higher costs at scale due to subscription fees
NB-IoT / LTE-M
- Very strong network coverage
- No gateway installation required
- International roaming capabilities
- Native cellular connectivity
- Requires cellular subscriptions
- Dependency on mobile network operators
3- Preparing an IoT deployment on site
During the radio mapping phase or a pre-site visit, it is essential to carefully assess the site and collect all relevant information needed for the IoT deployment. Proper preparation upstream saves significant time on site and, most importantly, helps avoid having to return for additional interventions.
Below are the key elements that should ideally be assessed before installation:
- Systems and equipment to interface on-site
meters, controllers, technical equipment
retrieval of technical documentation
identification of interfaces
validation of connection points
- Sensors to be deployed on site
reading user guides
understanding wiring specificities
checking required configuration parameters
- On-site installation constraints
access authorisations
safety requirements
required certifications and clearances
site typology
recommendations from the radio mapping report
- Site readiness for installation
construction work completed
equipment already in place
validated access conditions
- List of required installation tools
mounting and fixing elements
interfacing cables
radio repeaters if required

IoT sensor preparation
1- Configuring IoT sensors
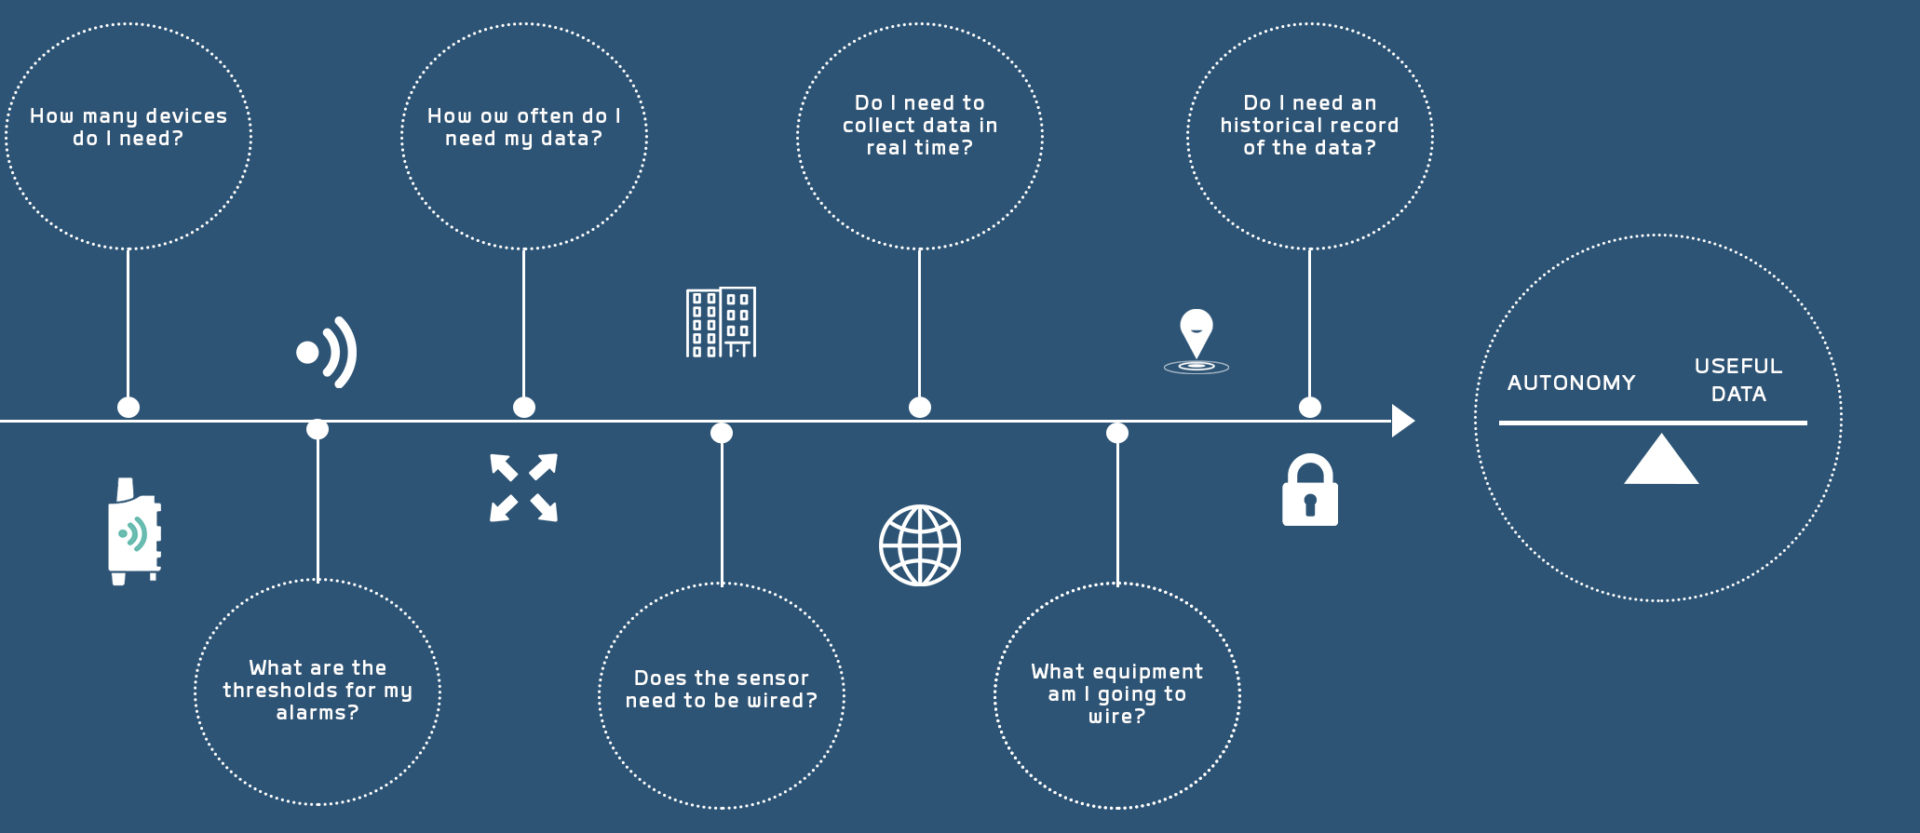
In preparation for installation, it is now necessary to configure all IoT sensors intended for the building. The key is to make configuration choices that best match the project requirements.
Making the right decisions can be summed up as finding the right balance between sensor autonomy and useful project data. What configuration allows you to collect the right amount of data — sufficient for the use case — while maintaining battery life aligned with the project’s ROI targets?
Here are some key questions to consider when configuring sensors:
- How many sensors are required?
- How frequently should data be transmitted?
- Should alerts be triggered?
- Do the sensors need to be wired?
- Which parameters need to be defined?
Each project is different, and the answers to these questions help define the most suitable sensor configuration. They also help identify the mechanisms required to meet project constraints, such as:
- data historisation
- redundancy
- alarms and alerts
- monitoring
- energy optimisation
1- Adeunis configuration solutions
To configure your Adeunis devices, three options are available:

IoT Configurator
An intuitive application available on Android and Windows, enabling one-by-one configuration via micro-USB.

KARE / KARE+
With the KARE platform, sensors can be updated remotely over the network.

IoT networks
Sensors can also be configured remotely via LoRaWAN downlink commands.
Once configured, the sensors are ready for installation and wiring.
As each sensor has its own specific wiring requirements, we recommend consulting the dedicated section at the end of the user guides.


On-site installation
1-Testing the IoT network
It is now time to go on site and install the IoT sensors. At this stage, the use of a network tester such as the Field Test Device (FTD) is strongly recommended to validate and fine-tune sensor positioning.
In radio communications, signal quality can vary from one metre to another, which can make the difference between reliable connectivity and communication failure.
2-Theoretical radio guidelines
To ensure optimal radio communication, we recommend:
- vertical sensor positioning
- installation at height
- keeping devices away from obstructive materials
- limiting metal structures and reinforced concrete obstacles

3- INSTALLATION OF IoT SENSORS IN PRACTICE
Here are some practical examples of successful installations:
Cold room
The materials making up a cold room can inhibit radio, so here the sensor was placed outside the room while the probe remained positioned inside.
Boiler room
In this boiler room, the sensors are positioned vertically on masts and the probes are as close as possible to the hot water pipes for a better measurement (clamp on the metal lug of the product, or positioning in a thermowell).
Meters
An important precaution to take when installing IoT sensors on meters: electrical cabinets or other metalic enclosures may inhibit radio, a closed-door test prior to installation with a network tester is mandatory.
Amphitheatre
In this amphitheatre, two temperature and humidity sensors were positioned at the top and bottom of the room (difference between the top and bottom can be up to 2°C). As they were not allowed to drill, the sensors were glued to the walls.

Boiler room
In this boiler room, the sensors are positioned vertically on masts and the probes are as close as possible to the hot water pipes for a better measurement (clamp on the metal lug of the product, or positioning in a thermowell).

Cold room
The materials making up a cold room can inhibit radio, so here the sensor was placed outside the room while the probe remained positioned inside.

Meters
An important precaution to take when installing IoT sensors on meters: electrical cabinets or other enclosures may inhibit radio, a closed-door test prior to installation with a network tester is mandatory.

Amphitheatre
In this amphitheatre, two temperature and humidity sensors were positioned at the top and bottom of the room (difference between the top and bottom can be up to 2°C). As they were not allowed to drill, the sensors were glued to the walls.
4. The most common mistakes in an IoT deployment
Some recurring mistakes often occur during installations:
- poor radio coverage
- sensors installed too close to metal structures
- inappropriate measurement frequency
- underestimated battery autonomy
- lack of on-site validation
- insufficient monitoring
- incorrect threshold configuration
A successful IoT deployment relies as much on preparation as it does on the quality of the field installation.
5. How to industrialise a multi-site IoT deployment
As projects grow, it becomes essential to standardise:
- configurations
- installation procedures
- monitoring methods
- equipment maintenance
Device management tools such as KARE make it possible to:
- manage large sensor fleets
- monitor multiple buildings
- perform remote updates
- industrialise multi-site IoT deployments
Summary
Successfully deploying IoT is not just about installing sensors on site. It is a complete process that starts with proper preparation, including a clear understanding of the environment, use cases and technical constraints.
Success relies on reliable radio mapping to validate network coverage, appropriate sensor configuration, and proper on-site installation conditions to ensure stable communication. Finally, monitoring and industrialisation help sustain deployments and efficiently manage large-scale fleets.
Ultimately, a well-executed IoT deployment ensures reliable data, fewer field interventions and long-term ROI for Smart Building IoT projects.
Update: 17/06/2026